“Moon-yah-eeni” Magic
PART III:
Not Much this Oven
Can’t Do!
(the last of a three part series)
While the Mugnaini is not a “Pizza Oven”, it does make
awesome pizzas!
Jacque's first pizza --ever!!!
Our first hands-on dish was pizza. Louis and Andrea demonstrated how to make the
dough, and then turned us loose with balls of dough to toss/stretch and build
our own pizzas. I was once again
thrilled to see Jacque get right into it, tossing and building her own
pizza. It was then off to the oven for
cooking. I was returning to the kitchen
with my masterpiece when Andrea looked at my crust and suggested that it was “edible”,
but we might want to make another one and bake it a little longer. (Note
to self: when I think it is done, give it another thirty to sixty seconds;
after all no one likes a limp floppy pizza!)
Rule Number 1 about Pizza: “You can make bad dough out of
good flour, but you cannot make good dough out of bad flour.”
You want to use a 00 flour, and hence I
returned with another case of the Giusto’s High Performance Pizza Flour from
the Mugniani store.
You can buy this
High Gluten, unbleached flour online from
www.mugaini.com.
It is 13% protein, and 100% dark northern
spring wheat.
It is the only flour I
have been using since Gay and Marci bought me a case for Christmas, and I am now
sworn to it. It is AWESOME!
While enjoying our pizzas, we learned another important
aspect of the class:
food is to be
enjoyed with wine.
We learned this
when Ed came out and started serving us one of his wines from his vineyard and
winery.
Ed produces his own wine as well
as sells some of his grapes to larger wineries.
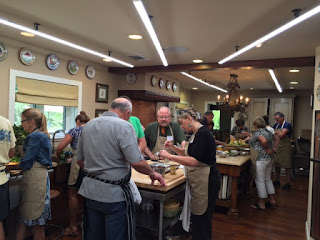
Unlike other cooking classes, at the Mugnaini Cooking School
it is hands on. You don’t have someone
sitting over you telling you how to cut or julliene a pepper. Andrea and her staff circulate to offer
assistance where needed, and are close by when using the ovens, but they don’t
micromanage you which was refreshing.
After our pizza lunch it was back into the kitchens for the
real hands on cooking part of the class.
Chef Louis and Andrea turned the students loose at several stations with
ingredients. Again I was thrilled when
Jacque decided to venture off on her own to work with other students at the sea
food station. Jacque’s team worked on
Caramelized Scallops, Cherries and Fennel with Summer Savory and Pancetta
Vinaigrette.
As for me, I was excited to try my hand at the Tuscan Grill
for the Wood Oven so I went to work on the Cumin and Chili Spiced Loin of Beef
with Roasted Cherry Tomatoes, Charred Peppers and Toasted Bread.
Below taken from Mugnaini
Cooking School Student Pamphlet:
Ingredients
·
4 cups
cherry tomatoes
·
1
tablespoon olive oil
·
1 teaspoon
kosher salt
·
6 cups
mixed sweet peppers, deseeded and halved
·
1 cup
thinly sliced red onion
·
4 cups
large diced sourdough
·
1
tablespoon ground cumin
·
1
tablespoon Aleppo Pepper (can substitute smoked paparika)
·
1
tablespoon kosher salt
·
2 pounds
Ribeye, flank, strip, skirt, flat iron steak
·
¼ cup
sherry vinegar
·
¼ cup olive oil
Toss the cherry
tomatoes, olive oil, and kosher salt together and put on half sheet pan*. Slide into the oven and roast for 5 minutes,
remove and let cool.
Lay the sweet peppers
cut side down and slide into the oven close to the fire and cook to a medium
char on the skin. Remove and toss in a
bowl with the roasted tomatoes. Add the
sliced red onions.
Lay the diced
sourdough out onto a sheet pan and toast in the oven; make sure you are
rotating the pan to evenly toast the bread.
Remove and cool.
Combine the cumin,
Aleppo pepper and kosher salt, lightly season both sides of steak and let sit
at room temperature for 1 hour**. Set up
the Tuscan grill over a bed of coals at the mouth of the oven and grill the steaks
to desired temperature. Remove and let
stand for 15 minutes*** before serving.
Push the embers used
for the grill back into the oven.
Combine the sourdough croutons, peppers, tomatoes, and onions in a large
roasting pan and slide into oven to warm.
Remove and toss with the olive oil and sherry vinegar. Slice the beef and lay on top of bread salad.
* We returned home with four commercial half cookie
sheets. This was another valuable
take-away on how versatile these inexpensive items are for both wood oven
cooking and normal cooking in your home kitchen.
** You never want to cook meat right out of the fridge. You always want to try to let meat get to
room temp before cooking.
*** Meat really does need to rest after it has been
cooked. This allows it to absorb the
juices. In this dish we were laying it
over croutons and salad, so letting it rest in this case was very important.
With the addition of my Tuscan Grill for my wood oven,
Jacque is now questioning the “need” for the plethora of other devices I have
in our backyard, (i.e. Big Green Egg, Treager, and an Argentinean Grill in
addition to the Mugnaini Wood Oven). I
continue to remind her that it is not a need,
but rather a want.
Other dishes prepared that afternoon included a Baked
Humbolt Fog Goat cheese with Honey and Toasted Sourdough, Rock Shrimp Rolls,
Slow Cooked Salmon and Vegetable Spring Rolls.
Before departing on Friday afternoon for our Hotel
Healdsburg, we were told to not have breakfast before class the next day…glad we did not. (Truth is we barely had dinner after an
afternoon of cooking, sampling, oh and drinking wine that Ed kept appearing
with.)
Saturday morning upon our arrival back to class, we were
greeted with warm Cinnamon Rolls with Toffee Sauce, Baked Steel Cut Oats with
dried Cherries and Maple Syrup, Baked Eggs with Cream, Slow Braised Spiced
Tomato Sauce, and Bacon. I personally
can’t wait to have company over and treat them to a wood oven breakfast!
That Saturday we also sampled three mouthwatering dishes
that were cooked overnight in the wood ovens:
Overnight Chickpea Hummus with Feta, Oregano, and Marinated Cucumbers,
Slow Roasted Chinese Eggplant with Jalapeno, Mint and Cilantro, and Moroccan
Spiced Summer Squash with Dill Yogurt and Roasted Peppers.
Chef Maldonado spent time partnering with Mourand Lahlou,
the author of Mourand New Moroccan – the
Cookbook. As a result, a lot of the dishes we worked on had a Moroccan
influence. So many people think of just
Italian for wood ovens, but again, that would be like simply calling it a
“Pizza Oven”.
After breakfast, - which
included an offer of Bloody Marys compliments of Ed! - it was back to our stations for
cooking. I headed off to work on the
Seafood Paella, while Jacque worked on Mustardy Glazed Short Ribs, (which turned
out like beef candy!!!), and Creamed Hen of the Wood Mushrooms with Parmesan Breadcrumbs. Not surprisingly, Jacque has now been on a
quest to find Hen of the Wood Mushrooms.
I have never made Paella before so this was a totally new
venture for me.
I was not only excited
about the new dish I was preparing, but was also excited to just use a Paella
pan in the wood oven,
again demonstrating its versatility.
Below taken from Mugnaini
Cooking School Student Pamphlet:
Ingredients
·
Saffron
and Clam Broth
o
3 cups
White Wine
o
2 pinches saffron
o
Zest of 2
lemons
o
4 cloves
of garlic – smashed
o
1 teaspoon
kosher salt
o
1 tablespoon
Smoked paprika
o
8 cups
chicken stock
o
2 cups
clam juice
·
Paella
o
4 whole
chicken legs
o
¼ cup
olive oil
o
½ cup
piquillo peppers
o
1 cup
small diced onion
o
1 cup
small diced carrots
o
2 cloves
garlic, crushed
o
1 cup
thinly sliced leeks
o
1
tablespoon kosher salt
o
4 ounces
sliced squid rings
o
2 cups
Bomba rice
·
Seafood to
Finish
o
1 pound
rock cod, cut into 2 ounce portions
o
4 ounces
rock shrimp
o
8 large
head on prawns
o
16 manila
clams
·
Optional
Garnishes
o
Garlic
aioli
o
Grilled
lemons
o
Calabrian
chili oil
o
Charred
filet beans
o
Grilled
Spring Onion
In a medium saucepot
combine the white wine, saffron, lemon zest, garlic, kosher salt, and smoked
paprika. Reduce the wine by half. Add the chicken stock and clam juice to the
pot and simmer for 30 minutes. Strain
and reserve the cooking liquid.
Paella: When the oven is in a pizza environment, stop
adding wood and develop a large bed of embers.
Remove the log grate and arrange the embers into a 4” high and 18” wide
pile in the front ¼ part of the oven.
Place the Tuscan grill base and grill in the center of the ember pile,
making sure you are able to grab the handle of the pan when needed.
In large paella pan
add olive oil, chicken, skin side down, the vegetables and salt. Place the pan on top of the Tuscan grill and
cook for 25 minutes stirring every 5-7 minutes to evenly roast the
vegetables. Remove the pan carefully
from the oven and add sliced squid and rice.
Stir to incorporate into the mixture and place back onto the base and
bake for 5 minutes.
Remove the pan and add
8 cups of the saffron stock. Make a lid
out of aluminum foil and set on top of the pan.
Place back onto the Tuscan grill and cook for 25 minutes. Carefully remove pan, take off aluminum foil
and lay rockfish along the outside perimeter of paella pan, follow with ring of
prawns, place the clams into the rice throughout the pan and the sprinkle rock
shrimp over the entire surface. Put the
aluminum lid back on and place onto the Tuscan grill for 12 minutes to finish
cooking. Remove and serve.
The entire process is
cooked and elevated over the embers and never is cooked on the oven floor, adhering
to the traditional way of cooking paella which develops a deep socorrat-meaning
the rice that gets crunchy and forms a crust at the bottom of the pan.
While Paella was cooking and Jacque’s braised ribs were
“braising away”, Andrea pulled all of us outside for a bread lesson. I had several takeaways from the bread
lesson:
o
It requires a special environment for proofing.
o
There is actual chemistry involved.
·
No fire in the oven.
o
Get it to temp and clean it out immediately.
·
To get the hard crunchy crust you need steam.
·
Last but not least…
o
There is nothing like nice fresh warm bread
right out of a wood oven.
It was also while the Paella was cooking and the ribs were
braising that Ed took the class on a little field trip though his vineyard to
his herb garden and on to his winery.
His wine operation is not very large, and was actually very encouraging
to Jacque and me with our own small vineyard now planted at home. Ed puts out an amazing amount of quality wine
out of a pretty small operation. Jacque
and I are looking forward to our UPS shipment of Mugnaini wine that we
purchased during our little tour.
However the highlight of the tour was when Louis showed up with the
Paella for everyone to share while tasting wine in the winery.
So if you have not got it yet – this three day adventure was
just one cool experience after another.
It would not have been so if it weren’t for Andrea’s combination of
intensity, passion, and grace, and Louis Maldonado’s easy to get along with
personality, talent, and creativity. And of course we can’t forget Ed, the
driver’s, humor, who knew how to keep the class from getting too serious by
either cracking a joke, or by plying us with wine just when it was needed.
Jacque and I are anxious to attend more Mugnaini classes in
Healdsburg, and have already decided to attend one of her week long courses which
she offers in Tuscany in 2018…anybody want to join us?
If you already own a wood oven, or are considering purchasing or building a wood oven, I highly recommend signing up from one the Mugnaini classes. check out the listing of classes at www.mugnaini.com.


